Overview
Varibill uses roles and permissions to control what users can see and do in the User Interface.
The basic setup is:
- Create a role.
- Assign permissions to the role.
- Save the role.
- Assign users to the role.
Users can be assigned to more than one role.
Roles and users are managed under Navigation > Admin.
Create a Role
- Navigate to Admin > Roles.
- Click New.
- Enter a Name for the role.
- Enter a Description explaining the purpose of the role.
- Assign the permissions required for the role.
- Click Save.
Role names can contain up to 100 characters and descriptions up to 500 characters.

Tip: Use role names that clearly describe the user’s responsibility or level of access, such as Billing Administrator, Read Only, or Technical Support.
Assign Permissions to a Role
Permissions determine which areas of Varibill a role can access and which actions users assigned to that role can perform.
In the Permissions section of the Role Editor, permissions are displayed by:
- Feature: the area of Varibill the permission applies to.
- Action: what the user can do in that area, such as View, Create, Edit, Delete, Clone, or Assign.
The Role Editor separates permissions into:
- Available Permissions: permissions not currently assigned to the role.
- Assigned Permissions: permissions currently included in the role.
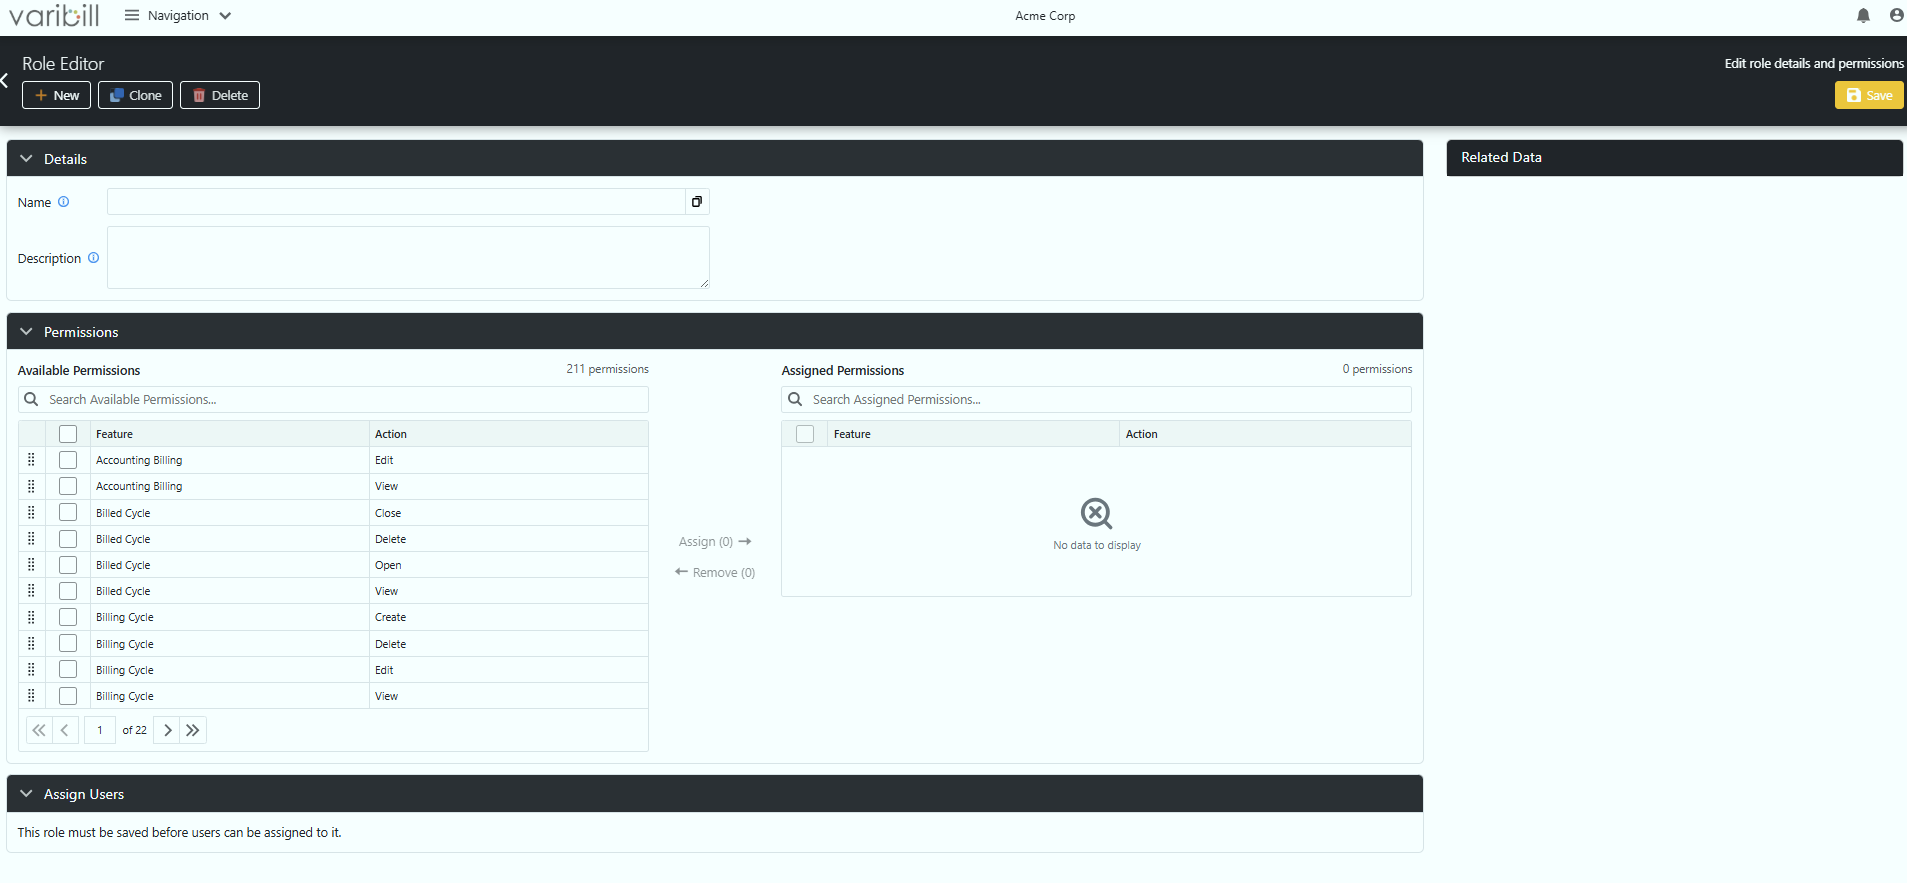
Add Permissions
- Select one or more permissions under Available Permissions.
- Click Assign.
- Confirm that the permissions appear under Assigned Permissions.
- Click Save to save the role.
Use the search fields above each list to find permissions by feature or action.
Permissions can also be moved between the available and assigned lists using drag and drop.
Remove Permissions
- Select the permissions to remove under Assigned Permissions.
- Click Remove.
- Click Save to save the changes.
Note: Permission changes are not applied until the role is saved. If you leave the Role Editor without saving, the changes are discarded.
Assign Users to a Role
A role must be saved before users can be assigned to it.
After saving the role:
- Open the role in the Role Editor.
- Expand Assign Users.
- Select the users to add from Available Users.
- Click Assign.
Users already assigned to the role appear under Assigned Users.
To remove a user from the role, select the user under Assigned Users and click Remove.
Note: Assigning or removing users takes effect immediately. Unlike permission changes, user assignments do not require the role to be saved again.
If you cannot assign users, confirm that your own role includes the Role Assign permission.
Assign Roles from a User
Roles can also be managed from an individual user’s record.
- Navigate to Admin > Users.
- Open the user you want to manage.
- Expand Assign Roles.
- Select the roles to assign to the user.
- Click Assign.
To remove a role, select it from the assigned roles and click Remove.
Note: A new user must be saved before roles can be assigned to them.
The Roles column on the User grid shows the roles currently assigned to each user.
Manage Existing Roles
Edit a Role
To change an existing role:
- Navigate to Admin > Roles.
- Click the Edit icon for the role, or double-click the role to open it.
- Update the role details or assigned permissions.
- Click Save.
Changes to the role’s permissions apply to users assigned to that role.
Clone a Role
Cloning is useful when a new role requires similar permissions to an existing role.
- Select the role to copy from the Roles grid.
- Click Clone.
- Update the Name and Description for the new role.
- Add or remove permissions as required.
- Click Save.
The new role is created with the permissions copied from the original role.
Delete a Role
- Open the role in the Role Editor.
- Click Delete.
- Enter the required confirmation when prompted.
- Confirm the deletion.
Warning: Deleting a role removes that role from all users currently assigned to it. Before deleting a role, confirm that affected users have any other access they require.
How Roles and Permissions Work
Permissions
A permission represents access to a particular Feature and Action.
For example:
Client + Edit
allows a user with that permission to edit Client records.
Rather than assigning individual permissions directly to every user, permissions are collected into roles. Roles can then be assigned to users according to their responsibilities.
Multiple Roles
A user can have more than one role.
When multiple roles are assigned, the user’s available permissions are combined across those roles. If any assigned role grants a permission, the user has that access.
This allows roles to be kept focused while additional access can be provided through another role where required.
When a User Does Not Have Permission
Varibill checks permissions when users open protected areas or perform protected actions.
Page Access
When a user opens a page, Varibill checks whether their assigned roles include the required View permission.
If access is not available, a Permission Required page identifies:
- the feature being accessed;
- the required action;
- the user’s current role or roles; and
- the Tenant.
Actions
Actions such as creating, editing, deleting, cloning, reversing, crediting, or rebilling can require their own permissions.
If a user attempts an action they do not have permission to perform, Varibill displays a Permission Required message.
Note: Some actions may remain visible even when the user does not have permission to perform them. Varibill checks the required permission when the action is selected.
Request Access
If a Permission Required message is displayed:
- Click Copy request message.
- Send the copied message to your Varibill administrator.
The request includes the feature and action required, the user’s current roles, and the Tenant.
An administrator can then:
- add the required permission to an existing role; or
- assign the user another role that already provides the required access.
Was this article helpful?
That’s Great!
Thank you for your feedback
Sorry! We couldn't be helpful
Thank you for your feedback
Feedback sent
We appreciate your effort and will try to fix the article